SpringSecurity框架基本使用
入门案例
第一步 创建Springboot工程
第二部 引入相关依赖
xml<!--SpringSecurity 依赖--> <dependency> <groupId>org.springframework.boot</groupId> <artifactId>spring-boot-starter-security</artifactId> </dependency>
第三步 编写controller进行测试
java@RestController @RequestMapping("/test") public class TestController { @GetMapping("hello") String add(){ return "Hello securty"; } }
默认用户名:admin
默认密码:
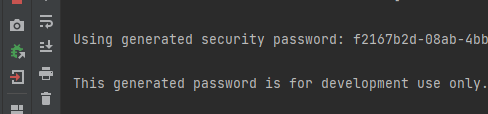
SpringSecurity 本质是一个过滤器链 他有很多过滤器
先重点看三个过滤器:
FilterSecurityInterceptor方法级的权限过滤器,基本位于过滤器链的最底部。
ExceptionTranslationFilter异常过滤器,用来处理在认证授权过程中抛出的异常
UsernamePasswordAuthenticationFilter对 /login 的POST请求做拦截,校验表单中的用户名,密码。
过滤器如何进行加载
SpringBoot对于SpringSecurity提供了自动化配置方案
- 使用SpringSecurity配置过滤器
DelegatingFilterProxy
UserDetailsService接口
当你什么也没有配置的时候,账号密码是由SpringSecurity定义生成的。而在实际项目中账号和密码都是从数据库中查询出来的。所以我们要通过自定义逻辑控制认证逻辑。
如果需要自定义逻辑时,只需要实现UserDetailsService接口即可。定义接口如下:
过程:
- 创建一个类并继承
UsernamePasswordAuthenticationFilter,重写三个方法 - 创建类实现
UserDetailsService,编写查询数据过程,返回User对象,这个User对象是安全框架提供对象
PasswordEncoder接口
数据加密接口,用于返回User对象里面密码加密。
Web权限方案
1.认证
2.授权
通过配置文件
spring.security.user.name=admin
spring.security.user.password=123456通过配置类
@Configuration
public class SecurityConfig extends WebSecurityConfigurerAdapter {
protected void configure(AuthenticationManagerBuilder auth) throws Exception{
BCryptPasswordEncoder passwordEncoder = new BCryptPasswordEncoder();
String password = passwordEncoder.encode("123123");
auth.inMemoryAuthentication().withUser("admin").password(password).roles("admin");
}
@Bean
PasswordEncoder password(){
return new BCryptPasswordEncoder();
}
}自定义编写实现类(重要)
代码实现(版本过时)
第一步 创建配置类
设置使用哪个userDetailsService实现类
@Configuration
public class SecurityConfigWeb extends WebSecurityConfigurerAdapter {
@Autowired
private UserDetailsService userDetailsService;
@Override
protected void configure(AuthenticationManagerBuilder auth) throws Exception{
auth.userDetailsService(userDetailsService).passwordEncoder(password());
}
@Bean
PasswordEncoder password(){
return new BCryptPasswordEncoder();
}
@Override
protected void configure(HttpSecurity http) throws Exception{
/**
* 自定义登录页
*/
http.formLogin()
.loginPage("/login.html")//登录页设置
.loginProcessingUrl("/user/login") //登录访问路径
.defaultSuccessUrl("/test/index").permitAll()//登录成功后跳转路径
.and().authorizeRequests()
.antMatchers("/","/test/hello").permitAll()//设置不需要认证的路径
.anyRequest().authenticated()//所有请求都能访问
.and().csrf().disable(); //关闭csrf防护
}
}第二步 编写实现类
返回User对象,User对象有用户名密码和操作权限
@Service("userDetailsService")
public class MyUserDetailsService implements UserDetailsService {
@Autowired
UsersMapper usersMapper;//注入实体类
@Override
public UserDetails loadUserByUsername(String username) throws UsernameNotFoundException {
//根据username查询数据
Users users = new LambdaQueryChainWrapper<>(usersMapper).eq(Users::getUsername,username).one();
//找不到用户则抛出异常
if (users == null)
throw new UsernameNotFoundException("用户不存在");
//创建一个权限给用户 这里的 “role”表示用户的角色权限
List<GrantedAuthority> authorities = AuthorityUtils.commaSeparatedStringToAuthorityList("role");
//返回security的User
return new User("tt",new BCryptPasswordEncoder().encode(users.getPassword()),authorities);
}
}基于角色或权限进行访问控制
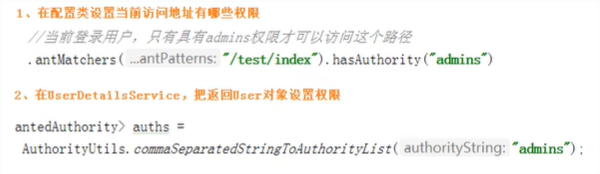
方法一:hasAuthority()
针对某一个权限
.antMatchers("/test/index","/admin/index").hasAuthority("admins")
↑ 需要admins权限才能访问路径 ↑
修改配置类
.hasAuthority("admins")
@Configuration
public class SecurityConfigWeb extends WebSecurityConfigurerAdapter {
(其他代码...)
@Override
protected void configure(HttpSecurity http) throws Exception{
/**
* 自定义登录页
*/
http.formLogin()
.loginPage("/login.html")//登录页设置
.loginProcessingUrl("/user/login") //登录url
//.permitAll()表示所有权限都可访问
.defaultSuccessUrl("/test/index").permitAll()//登录成功后跳转url
.and().authorizeRequests()
.antMatchers("/","/test/hello").permitAll()//设置路径所有人访问
//当前登陆的用户,有下列权限的才可以访问
.antMatchers("/test/index").hasAuthority("admins") //设置路径需要的权限
.anyRequest().authenticated()//所有请求都能访问
.and().csrf().disable(); //关闭csrf防护
}
}
方法二:hasAnyAuthority()
针对多个权限
.antMatchers("/test/index","/admin/index").hasAuthority("admins,role")
↑ 需要admins或者role权限才能访问路径 ↑
修改配置类
.hasAnyAuthority("admins,role")
@Configuration
public class SecurityConfigWeb extends WebSecurityConfigurerAdapter {
(其他代码...)
@Override
protected void configure(HttpSecurity http) throws Exception{
/**
* 自定义登录页
*/
http.formLogin()
.loginPage("/login.html")//登录页设置
.loginProcessingUrl("/user/login") //登录url
//.permitAll()表示所有权限都可访问
.defaultSuccessUrl("/test/index").permitAll()//登录成功后跳转url
.and().authorizeRequests()
.antMatchers("/","/test/hello").permitAll()//设置路径所有人访问
//当前登陆的用户,有下列权限的才可以访问
.antMatchers("/test/index").hasAnyAuthority("admins,role") //设置路径需要的权限
.anyRequest().authenticated()//所有请求都能访问
.and().csrf().disable(); //关闭csrf防护
}
}自定义403页面
修改添加访问配置类
// 配置自定义403页面
http.exceptionHandling().accessDeniedPage("/unauth.html");添加对应控制器
常用认证授权注解使用
@EnableGlobalMethodSecurity(securedEnabled = true)
@Secured
@Secured({"ROLE_normal","ROLE_管理员"})
@PreAuthorize
@PostFilter
@PreFilter
用户注销操作
在配置类中修改
/**
* 用户登出
*/
http.logout().logoutUrl("/logout").logoutSuccessUrl("/test/hello").permitAll();html
<a href="/logout">退出登录</a>自动登录(记住我)
一:创建数据库
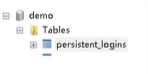
二:配置类
@Autowired
private DataSource dataSource;//注入数据源
//配置对象
@Bean
public PersistentTokenRepository persistentTokenRepository(){
JdbcTokenRepositoryImpl jdbcTokenRepository = new JdbcTokenRepositoryImpl();
jdbcTokenRepository.setDataSource(dataSource);
// jdbcTokenRepository.setCreateTableOnStartup(true);//启动时自动建表,没有表的情况下
return jdbcTokenRepository;
}三:配置类配置
.and().rememberMe().tokenRepository(persistentTokenRepository())
.tokenValiditySeconds(60)//设置有效时间 秒
.userDetailsService(userDetailsService)四:登陆页面添加复选框(remember-me)
记住我:<input type="checkbox" name="remember-me">csrf跨站请求伪造
SpringSecurity4+ 默认开启CSRF
关闭CSRF : http.csrf().disable(); //关闭csrf防护
html
<form action="/user/login" method="post">
<input type="hidden" th:name="${_csrf:parameterName}" th:value="${_csrf:token}">
用户名:<input type="text" name="username" id=""><br>
密码:<input type="password" name="password" id=""><br>
记住我:<input type="checkbox" name="remember-me">
<button type="submit">登录</button>
</form>完整代码示例
用户实体类
@Data
@TableName("user")
public class Users {
Long id;
String username;
String password;
}Mapper接口
@Mapper
public interface UsersMapper extends BaseMapper<Users> {
}config配置
@Configuration
public class SecurityConfigWeb extends WebSecurityConfigurerAdapter {
@Autowired
private UserDetailsService userDetailsService;
//注入数据源
@Autowired
private DataSource dataSource;
//配置对象 ,记住登录
@Bean
public PersistentTokenRepository persistentTokenRepository(){
JdbcTokenRepositoryImpl jdbcTokenRepository = new JdbcTokenRepositoryImpl();
jdbcTokenRepository.setDataSource(dataSource);
// jdbcTokenRepository.setCreateTableOnStartup(true);//启动时自动建表 仅第一次开启
return jdbcTokenRepository;
}
@Override
protected void configure(AuthenticationManagerBuilder auth) throws Exception{
auth.userDetailsService(userDetailsService).passwordEncoder(password());
}
@Bean
PasswordEncoder password(){
return new BCryptPasswordEncoder();
}
@Override
protected void configure(HttpSecurity http) throws Exception{
//配置url访问权限
http.authorizeRequests()
.antMatchers("/test/hello").permitAll()//设置路径所有人访问
//1 有下列权限的才可以访问 hasAuthority方法
// .antMatchers("/test/index").hasAuthority("admins")
//2 有下列权限的才可以访问 hasAnyAuthority方法
// .antMatchers("/test/index").hasAnyAuthority("admins,sale,staff")
//3 有下列角色的才可以访问 hasRole方法 ROLE_sales
.antMatchers("/test/index").hasRole("sale")
//4 有下列角色的才可以访问 hasRole方法 ROLE_sales
.antMatchers("/test/index","/test/test").hasAnyRole("ROLE_sale,ROLE_staff")
.anyRequest().authenticated();//所有请求 都 需要身份验证
//配置url的访问权限
http.authorizeRequests()
.antMatchers("/").permitAll()
.antMatchers("/**update**").permitAll()
.antMatchers("/login/**").permitAll()
.anyRequest().authenticated();
//关闭csrf防护
http.csrf().disable();
//自定义登录页
http.formLogin()
.loginPage("/login.html")//登录页面设置
.loginProcessingUrl("/user/login") //登录url(post表单提交url)
//登录成功后跳转url或页面 .permitAll()表示所有权限都可访问
.defaultSuccessUrl("/logout.html").permitAll()
//记住登录设置
.and().rememberMe().tokenRepository(persistentTokenRepository())
.tokenValiditySeconds(60)//设置有效时间 秒
.userDetailsService(userDetailsService);
//用户登出
http.logout().logoutUrl("/logout").logoutSuccessUrl("/test/hello").permitAll();
// 配置自定义403页面
http.exceptionHandling().accessDeniedPage("/unauth.html");
}
}service
@Service("userDetailsService")
public class MyUserDetailsService implements UserDetailsService {
@Autowired
UsersMapper usersMapper;//注入实体类
@Override
public UserDetails loadUserByUsername(String username) throws UsernameNotFoundException {
//根据username查询数据
Users users = new LambdaQueryChainWrapper<>(usersMapper).eq(Users::getUsername,username).one();
//找不到用户则抛出异常
if (users == null)
throw new UsernameNotFoundException("用户不存在");
//创建一个权限
List<GrantedAuthority> authorities = AuthorityUtils.commaSeparatedStringToAuthorityList("ROLE_admins");
//返回security的User
return new User(users.getUsername(),new BCryptPasswordEncoder().encode(users.getPassword()),authorities);
}
}HTML登录页
路径:resources/static/login.html
<!DOCTYPE html>
<html lang="en">
<head>
<meta charset="UTF-8">
<title>Title</title>
</head>
<body>
<form action="/user/login" method="post">
<input type="hidden" th:name="${_csrf:parameterName}" th:value="${_csrf:token}">
用户名:<input type="text" name="username" id=""><br>
密码:<input type="password" name="password" id=""><br>
记住我:<input type="checkbox" name="remember-me">
<button type="submit">登录</button>
</form>
</body>
</html>HTML登出
<a href="/logout">登出</a>
HTML自定义无权限页
<!DOCTYPE html>
<html lang="en">
<head>
<meta charset="UTF-8">
<title>Title</title>
</head>
<body>
<h1>无权限!</h1>
</body>
</html>SpringSecurity+Jwt前后端分离
引入SpringSecurity
<!--SpringSecurity 依赖-->
        <dependency>
            <groupId>org.springframework.boot</groupId>
            <artifactId>spring-boot-starter-security</artifactId>
</dependency>大概逻辑流程
微服务权限方案
1、什么是微服务
HTTP API
微服务架构风格是一种使用一套小服务来开发单个应用的方式途径,每个服务运行在自己的进程中,并使用轻量级机制通信,通常是HTTP API,这些服务基于业务能力构建,并能够通过自动化部署机制来独立部署,这些服务使用不同的编程语言实现,以及不同数据存储技术,并保持最低限度的集中式管理。
微服务优势:
(1)微服务每个模块就相当于-一个单独的项目,代码量明显减少,遇到问题也相对来说比较好解决. (2)微服务每个模块都可以使用不同的存储方式(比如有的用redis,有的用mysal等数据库也是单个模块对应自己的数据库。 (3)微服务每个模块都可以使用不同的开发技术,开发模式更灵活。
微服务本质:
(1)微服务,关键其实不仅仅是微服务本身,而是系统要提供一 套基础的架构,这种架构使得微服务可以独立的部署、运行、升级,不仅如此,这个系統架构还让微服务与微服务之间在结构上“松耦合”,而在功能上则表现为一个统一的整体。这种所谓的“统一的整体”表现出来的是统一风格的界面, 统一的权限管理, 统一的安全策略,统一的上线过程,统一的日志和审计方法,统一的调度方式,统一的访问入口等等。 (2)微服务的目的是有效的拆分应用,实现敏捷开发和部署。
2、微服务认证和授权实现过程
(1)如果是基于Session, 那么Spring-security会对cookie里的sessionid进行解析,找到服务器存储的session信息,然后判断当前用户是否符合请求的要求。 (2)如果是token,则是解析出token,然后将当前请求加入到Spring-security管理的权限信息中去。
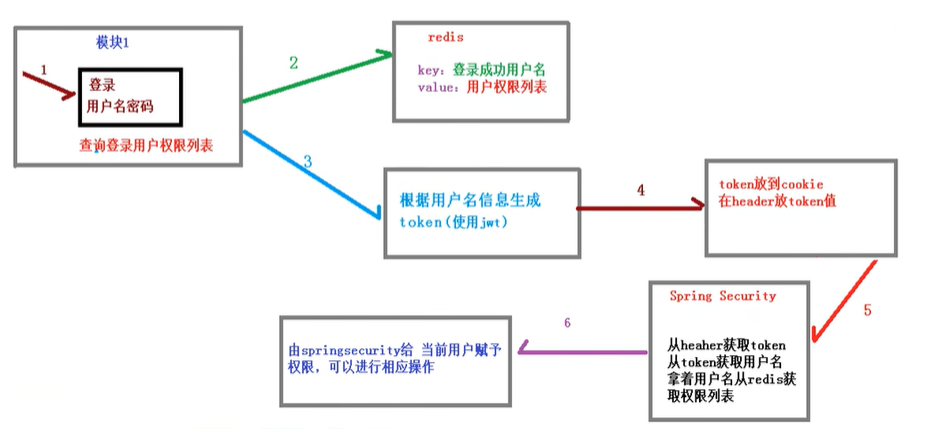
3、基于SpringSecurity认证授权方案
搭建项目工程
1.创建父工程
创建父工程 acl_parent : 管理依赖版本
2.在父工程创建子模块
- common
- service_base : 工具类
- spring_security : 权限配置
- infrastructure
- api_gateway : 网关
- service
- service_acl : 权限管理微服务模块